Mail Me your Makeup Looks
I really hope this post goes some way to helping anyone who is a little unsure in the realms of eye makeup. Send me your email address so I can see all of the looks you've come up with. I'd love to see how creative you all can be!
|
|
Eyeshadow Tips and Tricks: The Basics
Eye makeup is more than an art: it's wizardry. Creating a seamless blend of colours that draw attention to your eyes can be tedious, but here's a few tips and tricks to help you on your way.
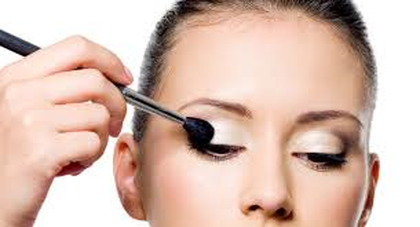
1. The Base
Some makeup artists insist that eyeshadow bases are essential to keep your look lasting all day. You can buy specific bases for your lids but I've found that a thin layer of concealer works just as well, but I don't deem this an essential step. The real trick to the base is to set your lids with a matte colour that matches your skin tone, or is even a few shades lighter, from your lid all the way up to your brow. Creating a matte base tackles the problem of shadows breaking apart and setting a powder base down first allows any colours you place on top to blend together with ease. Most eyeshadow palettes will contain a colour to suit your needs, but you can always take a bit of your face setting powder or even translucent powder on a brush or damp sponge to smoothen out your lids to prime for your other shadows.
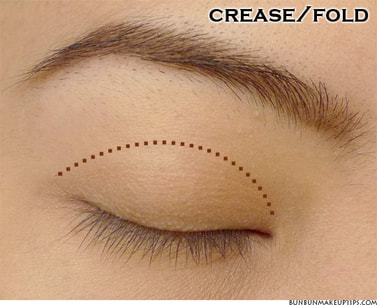
2. The Crease
The crease of your eyelid is where the skin folds between the eyelid and the brow bone. How you define your crease depends on the shape of your eyes, so make sure that you have determined your eye shape and worked out what shape or style works best for you. Taking a small, fluffy makeup brush, select a transition colour for your crease that compliments the other colours of your look or, if in doubt, use a matte neutral colour a couple of shades darker than your skin tone. You can always make use of your contour shade or bronzer to tie in your eye contour with your face if you're unsure what colours to use. If you're going for a dramatic, smoky look, use a colour a couple of shades darker than your transition and place it directly beneath, blending the darker colour upwards into the lighter with the fluffy brush you used for your transition or a clean blending brush for a smoother finish. Defining the crease is perfect for elongating the shape of your natural eye, adding a little depth and of course, bringing the drama. Don't be afraid to bring your transition colour higher than your crease, particularly if you have hooded eyelids, to ensure that it can be seen and is not lost when you open your eye.
3. The Lid
Your eyelid is where you can really play with colour, shimmers and glitter according to your taste. Use a flat brush to pack on the colour in patting motions to eliminate the chance of fall out on highly pigmented colours or dampen your brush with a splash of water or a spritz of a setting spray to lock the colour onto your lids. Again, make sure you blend your lid colour into your transition using the fluffy blending brush or a clean blending brush. Use a clean brush for shimmers to eliminate any harsh lines, unless you're going for a cut crease. When creating a cut crease, build the colour in your crease as demonstrating in Step 2, then use a flat brush to carve out the shape of your lid, and even a little higher, using concealer and set with powder before applying the lid colour.
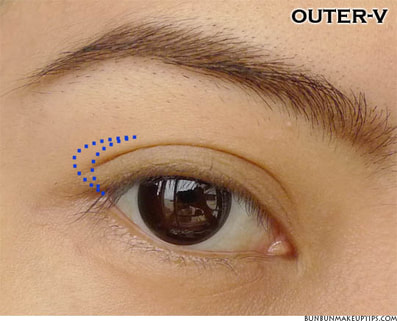
4. The Outer V
Your Outer V is the outer corner of your eyelid, going from the outer point of your lower lash line out slightly towards your hairline, and back in to meet the crease of your eyelid. Here is where you can use the darkest colours to add definition and smoke out an eye look. Use a pointed makeup brush for a precise line and take a fluffy brush to blend out the harsh edges. Blending is the key to every eye makeup look so make sure you blend your colours together to create a seamless finish.
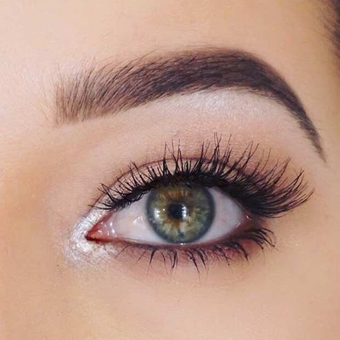
5. Highlight
As with the face, inject a bit of light and shade to your eye makeup to fully accentuate the contours of your eyes. To highlight, you can use either a light matte or shimmer colour on the brow bone and inner corners to really draw attention to your eyes. Experiment with glitter on the inner corners of your eyes to really add some drama. Use a small pencil brush or the tip of a flat brush to sweep the lighter colour below your brows for an instant eye-lifted look. You can make use of your face highlighters in your favourite shades or use any light shimmer or matte shadow you have to hand. Makeup is versatile and can be used for different purposes so don't assume that a face highlighter is strictly for the face or that an eyeshadow is only for eyes. You can also make use of shimmer eyeshadows to highlight your cheekbones, nose bridge, cupid's bow (the centre of the top line of your mouth) or anywhere else your choose to highlight.
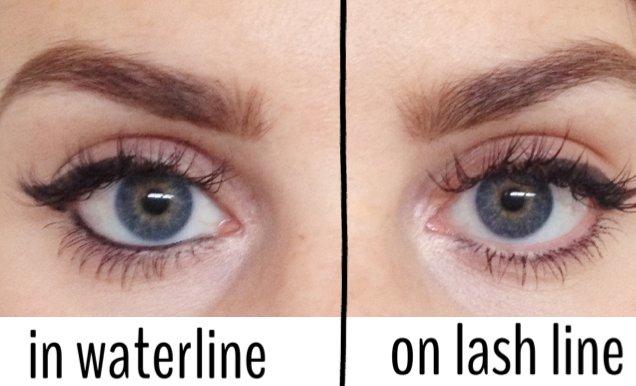
6. Lower Lash Line
For a more awake look, line your lower lashes firstly with the colour you used as your transition to tie the look together. Go in with a pencil brush or the tip of a flat brush with a darker colour to match or compliment the top of your eye on the outer portion of your lower lash line. Use lighter colours on your water line for an every day, wide-eyed look or sweep black, brown or darker colours on the water line for a dramatic, smoky look. As with the top portion of the look, blend the colours together for an airbrushed finish. Remember to not bring darker colours down too far as it may make you look more tired, unless you're going for a full on grunge, smoky look.
7. Clean Up
If you feel as though you've brought your crease colour too high, take a clean blending brush and blend. You can also use this trick to smooth out any harsh lines and blend colours together seamlessly. If the colours on your outer v have dropped too far, take a bit of concealer on a flat brush to swipe away the excess and set with powder for a clean finish.
8. Practise Makes Perfect
Be patient. It takes time to master the perfect eye look. But remember to use your creativity and be bold with your colour choices! Select colour palettes that suit you and your mood and as long as you blend them all together, you can't go too far wrong. Makeup is a bit of fun and at the end of the day, comes off with a wipe so don't take it too seriously and just create.
